FreeBSD installation:
Installation instructions for FreeBSD is readily available on the internet. This document will assume the installation of FreeBSD - Release 3.1 and properly configuring it as network ready
server. During installation you will have opportunities to make a few "selections" from Distributionsand Packages.
Distributions to Install:
bincompat2.2,dictdocmancatmanportssrc (from src - here you will select base and system src types)
Packages to Install:
Installing ssh (from the FreeBSD "Ports Collection"):
Note (Ports Collection): The FreeBSD Ports and Packages Collection offers a simple way
for users and administrators to install applications. Each ``port'' listed contains any patches necessary to make the original application source code compile and run on FreeBSD. Installing
an application is as simple as downloading the port, unpacking it and typing makein the port directory. For more information see Ports Collection.
So, with "ports" installing ssh is reduced to three simple steps.
Kernel Configuration:
To configure the kernel we will be copying a generic kernel configuration file and configure the new kernel by editing the "new" configuration file.
For this process it will help to have two shell windows open; they will be referred to as "window-1 and window-2". Be sure to perform all configurations as the user "root" (a.k.a.
superuser or administrator) The procedure is as follows:
Step 1: (window-1)
Step 2: Remove unnecessary devices not being used so that they aren't compiled into the kernel.
# dmesg | grep "not" (window-2) Locates devices "not found".In your vi session (editing the file VPN, window-1) , locate these device entries and delete them.
Step 3: Add a second network interface device for your second network interface card (NIC). For this step we will assume that you are using Intel Ether Express PRO/100B NICs (network interface i.d.'s fxp0 and fxp1).
# ifconfig -a (window-2) If you don't know or aren't sure what NIC's you are using. This will give you the network interface i.d. which you can locate in VPN (window-1).In VPN (window-1) Keep the network interface devices you are using and delete the rest.
Step 4 (Optional): If you are planning on running Network Address Translation (NAT), you will need to add the following lines to the file VPN (window-1):
Step 5: Compile the new kernel.
# config ./VPN (in the current directory: /usr/src/sys/i386/conf)# cd ../../compile/VPN (/usr/src/sys/compile)# make depend# make# make install# make clean (optional)
Server Configuration:
As part of the server install, several configurations must be made. Examples and excerpts of the configurations file listed below will be presented .
Configuration Files:
- /etc/rc.conf
- /usr/local/etc/sshd_config
- ~/.shosts
Step 1 (Configure the gateway): In /etc/rc.conf add the following lines:
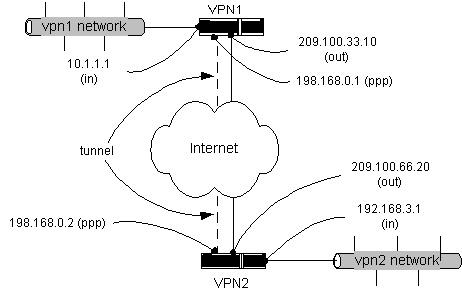
### Network routing options: ###defaultrouter="209.100.33.10" # Set to default gateway (or NO).
[NOTE: This is the
vpn1-out IP address]gateway_enable="YES" # Set to YES if this host will be a gateway.
Step 2 (Configure ssh): In /usr/local/etc/sshd_config change the following default.
- RhostsRSAAuthentication yes # The default is "no"
Step 3 (Optional; Configure NAT): In /etc/rc.conf add the following lines:
- firewall_enable="YES" # Set to YES to enable firewall functionality
- firewall_type="open" # Firewall type (see /etc/rc.firewall)
- firewall_quiet="NO" # Set to YES to suppress rule display
- natd_enable="YES" # Enable natd (if firewall_enable == YES).
- natd_interface="fxp0" # Public interface to use with natd.
- natd_flags="-f /etc/natd.conf" # Additional flags for natd.
[NOTE: More about
natd and natd.conf for port redirection can be found in the man pages - # man natd]
- network_interfaces="fxp0 fxp1 lo0" # List of network interfaces (lo0 is loopback).
Step 4 (Restart your server): Reboot.
Back to Top
IV. Configuration & Startup
The remaining configure items to have a working VPN connection are configuring the point-to-point protocol (ppp) both the local (incoming) and remote (dialout) servers.
Configuring Dial-Out PPP: (On VPN1)
Configuration File: /etc/ppp/ppp.conf
Start-up Script: /etc/ppp/vpn2
The configuration will be done by example, editing the /etc/ppp/ppp.conffile. In this example vpn1 and vpn2
(our "two bastion" example) will be referred to as introduced in the planning portion of Section II (above).
file: /etc/ppp/ppp.conf
|
VPN1 (master) ppp configuration
default:
set timeout 0
set log phase chat connect lcp ipcp command
set device localhost:ppploop
set dial
set login
set server /var/tmp/loop "" 0177
vpn2:
set device !/etc/ppp/vpn2
set ifaddr 192.168.0.1 192.168.0.2
add 192.168.0.0 255.255.255.0 HISADDR
|
|
script: /etc/ppp/vpn2
|
#!/bin/sh
exec ssh -C -c blowfish 209.100.66.20 '/usr/sbin/ppp -direct vpn1'
# NOTE: -C is for compression, and -c blowfish is the cypher. You can choose from other options.
|
|
Configuring Incoming PPP: (On VPN2)
Configuration File: /etc/ppp/ppp.conf
Again, the configuration will be done by example, editing the /etc/ppp/ppp.conffile. In this example vpn1 and vpn2
(our "two bastion" example) will be referred to as introduced in the planning portion of Section II (above).
file: /etc/ppp/ppp.conf
|
VPN2 (slave) ppp configuration
vpn1:
set timeout 0
set log phase lcp ipcp command
add 10.1.1.1 255.255.0.0 HISADDR
allow mode direct
|
|
Back to Top
V. Tips and Troubleshooting
Troubleshooting your VPN connection is a relatively simple process. If you are having problems and with the VPN connection (i.e. cannot ping or trace a route, try the following:
- Check your routes (netstat -rn).
- Check for running daemons: ppp sshd (natd - if you are using NAT).
- Interrogate your ppp connection with ppp in "interactive" mode.
Back to Top
VI. Maintenance
The care and feeding of VPN is minimal. Log maintenance is handled by FreeBSD automatically. The system's administrator will only need to monitor the daemons and basic
network functionality. If you wish to deploy the simple network management protocol (SNMP), this is a convenient method of performing network monitoring. All you will need to do is, at
the time of installation of FreeBSD (or afterwards, using the "ports collection") install the ucdsnmp package.
Back to Top
Appendix A. Command Reference
The commands needed for implementation and maintenance of VPN are:
- ssh
- ppp
- natd (if you are implementing NAT)
These commands all have well documented man pages on your server as well as at freebsd.org.
Back to Top